The last piece of the controller puzzle is now left to puredata. I need to parse the incoming serial stream from the arduino and run those values into the videoFilePlayer object that was created in the first video tutorial.
Serial Parsing
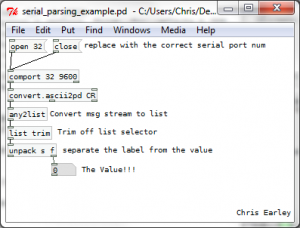
This bit took me the longest to get working. There are lots of serial reading objects out there but very few of them have documentation or sample patches, so you’re really left in the dark on how to get them to work. One that I got to convert.ascii2pd which is part of the pdmtl library. Here’s a simple example of how to use the object: [Download the patch]
Now that I can get the flex values, all I have to do is smooth them over and plug them into some video and audio player objects.
Fast forward a couple hours and I have this: [the final GUI]
Now since I didn’t have time to document the process here I’ll go into each component and how it works.
Starting from the upper with and going clockwise:
- The standard GEMWIN and PD DSP controls, you’ll see these on any patch that uses GEM or audio computation. They open the GEM window and start the visual process and start/stop the computation of audio, respectively.
- Serial controls. Just like I described above, this section parses the serial stream from the arduino and smooths it a bit and rounds in to an int value and sends it off to any area that receiving data from the flexvalue label.
- Name and description. I’m using canvas objects to make the colored background by the way.
- Flex value to frame num conversion. This area just divides the total number of frames by the maximum possible flex value [1024] so we can get a mapping of flex to frames.
- Audio controls. This section allows the user to load an audio file and have it be scrubbed/played by the current [scaled] flex value that’s being sent around. The played audio is then sent to the speakers.
- Video controls. Lastly, this section has a video file open dialog which feeds into a generic videoFilePlayer object from the wiki tutorials. The plyback of the opened video is controlled by a looper that takes a start and end position and continuously loops those frames. The flexvalue is used to change the start position of the loop and the rest of the info [loop length, playback speed] is supplied by the user.
